 Website


paypal integration website
Start with PayPal Buttons: When Devs & SMBs Should Use Orders v2
Decide whether to use PayPal Buttons or the JS SDK with Orders v2. Developer quickstart, sandbox testing, and a go-live checklist for dev teams and SMBs.
Use PayPal’s Payment Buttons for the fastest no-code checkout, and use the JavaScript SDK plus Server SDK (Orders v2) when you need full control, subscriptions, or a custom checkout UI. Either way, your first move is the same: create a PayPal developer account, grab your sandbox client ID and secret, and test the full flow in Sandbox before you touch live keys.
TL;DR:
- Only use the JavaScript SDK and Server SDK for complex features like subscriptions, custom UI, or advanced order management, while basic sales can rely on payment buttons.
- Always test in sandbox with sandbox accounts and simulate errors, declines, and webhooks to prevent issues during live transactions.
- Handle all amounts server-side, validate webhook signatures, and implement idempotent logic to avoid duplicate captures or payment inconsistencies.
- Swap to live credentials only after successful sandbox testing, and verify webhook registration and signature validation before full deployment.
- Simplify PayPal integration with pre-built components from platforms like WebsitePublisher to avoid the complexity of environment setup and API handling.
Table of Contents
- Paypal Integration Website Options: Buttons vs. Full SDK
- Which Paypal Integration Path Fits Your Business?
- How Do You Build a Custom PayPal Checkout Integration?
- How Should You Test PayPal in Sandbox Before Going Live?
- Security and Implementation Best Practices for PayPal
- Go-Live Checklist for PayPal Payment Integration
- What Happens After a PayPal Payment Completes?
- Common PayPal Integration Problems and How to Fix Them
- Why Most Businesses Overthink Their PayPal Setup
- Skip the Integration Work Entirely With WebsitePublisher
- Sources
Paypal Integration Website Options: Buttons vs. Full SDK
Every business adding PayPal integration to a website has to pick a lane, and the two lanes look nothing alike.
Payment Buttons are copy-paste embed code. You generate a snippet from your PayPal business dashboard, drop it into your HTML, and you have a working PayPal button on website pages within minutes. Buttons support PayPal, Venmo, Pay Later, and major credit and debit cards, and PayPal hosts and maintains the button flow for you, including with no monthly fees for the basic button setup. If you sell a handful of products at fixed prices, this is usually enough.
The JavaScript SDK paired with a Server SDK gets you there differently. Your front end renders the checkout UI, but your back end talks to PayPal’s Orders v2 API to create and capture orders, issue refunds, and manage delayed or partial captures. This path supports:
- Subscriptions and recurring billing schedules
- Custom, brand-matched checkout screens instead of a hosted widget
- Webhook-driven order lifecycle tracking (pending, completed, refunded)
- Partial captures and voids for order changes after the fact
Move from buttons to the API once you need automated recurring billing or a checkout that doesn’t look like it was bolted on. That shift is almost always about lifecycle control, not payment volume.
Which Paypal Integration Path Fits Your Business?
Run through this before writing a line of code.
- Catalog complexity. A single product or a short price list works fine with Buttons. A catalog with variants, subscriptions, or bundles needs the Orders v2 API.
- Developer resources. No in-house developer and no budget for one? Buttons remove the server-side work entirely.
- UI control. If checkout has to match your brand pixel for pixel, you need the SDK. Buttons look like PayPal, not like you.
- Timeline. Buttons can go live today. A full SDK integration with proper testing usually takes days, not hours.
- Compliance scope. Buttons keep you almost entirely out of card-data handling. Custom card fields through the SDK still require attention to PCI scope, even though PayPal tokenizes the sensitive data.
A solo consultant selling one coaching package should stop at Buttons. A subscription box business processing recurring charges and prorated refunds needs the Orders v2 path, full stop.
Pro Tip: If you’re not sure which camp you’re in, start with Buttons. You can layer in the JS SDK later without ripping out your PayPal account setup or losing transaction history.
How Do You Build a Custom PayPal Checkout Integration?
This is the core developer flow for PayPal checkout integration: a client that renders the button, and a server that owns the money logic.
Prerequisites
- A PayPal Business account
- A backend language/framework you’re comfortable with (Node, Python, PHP, whatever)
- Environment variables set up to hold your client ID and client secret, never hardcoded in source
Client-side steps
- Add the JS SDK script tag, passing your sandbox
client-idas a query parameter - Render the
Buttons()component (or Card Fields if you want an embedded card form) - On click, call your own server endpoint to create the order, then hand the returned
orderIDback to the SDK - On approval, call your server’s capture endpoint with that order ID
Server-side steps
- Authenticate with PayPal using OAuth 2.0 client credentials to get an access token
- Build a
createOrderendpoint that hits the Orders v2 create-order call, calculating the total from your own database, never from anything the browser sends - Build a
captureOrderendpoint that calls the Orders v2 capture call once PayPal confirms buyer approval - Store the resulting order ID and status so you can reconcile it later
This is the single most important rule in the entire integration: never accept or compute order amounts from client-side code. A user with browser dev tools can rewrite any number your JavaScript sends. Amounts belong on your server, tied to your own product data.
Error handling that actually matters:
- Map declined-card responses to a clear “try another payment method” message, not a generic failure screen
- Guard against duplicate captures by checking order status before calling capture a second time (a user double-clicking “Pay” is more common than you’d think)
- Log the PayPal error
nameanddebug_idfields, not just a generic “Payment Failed” string, so support tickets are actually solvable
With over 400 million active PayPal accounts worldwide reported by Statista, a broken checkout flow isn’t a small edge case. It’s a lost sale for a payment method a meaningful share of your visitors already trust.
How Should You Test PayPal in Sandbox Before Going Live?
Skipping sandbox testing is how businesses discover integration bugs from angry customers instead of quietly, on their own schedule.
Set up both a sandbox business account and a sandbox buyer account inside your PayPal developer dashboard, then run through the full purchase flow as the buyer account. Enable negative testing when it’s available for your integration type, which lets you simulate declines and error responses instead of hoping a real card fails at the right moment.
Before you touch anything live, confirm you can:
- Complete a successful sandbox transaction end to end
- Trigger and correctly handle a simulated decline
- Receive a webhook event and validate its signature
- Process the same webhook event twice without creating a duplicate order (idempotency matters here, since PayPal can and does resend events)
- Simulate insufficient funds and a duplicate form submission from an impatient user
If your webhook handler chokes on a resent event, you’ll find out in sandbox for free instead of in production with a real customer watching.
Security and Implementation Best Practices for PayPal
A handful of rules separate a solid PayPal payment integration from one that gets exploited.
Amounts get calculated server-side, always. Client secrets and live credentials live in environment variables or a proper secrets manager, never in a public repository, and you rotate them if you ever suspect exposure. Every webhook needs signature verification against PayPal’s public certificate before you trust its payload, and every webhook handler needs to be idempotent so a resent event doesn’t trigger a second capture.
Keep logging lean, too. Don’t log full card numbers, full customer addresses, or raw API tokens, even in a “temporary” debug log you meant to delete.
Pro Tip: If you’re running a multi-tenant platform where different clients each have their own PayPal account, store each tenant’s credentials separately and scope every API call to that tenant. Hardcoding one global credential set is how one client’s refund accidentally touches another client’s order.
Go-Live Checklist for PayPal Payment Integration
Going live is where sandbox habits either hold up or fall apart.
- Swap sandbox client ID and secret for live credentials, and run one small, real transaction end to end before promoting to full traffic.
- Confirm production webhooks are registered in your PayPal dashboard and that signature validation is active, not just copied from your sandbox config.
- Test a live refund and a live dispute response so you’re not learning that workflow during an actual customer complaint.
- Reconcile every transaction from your first live day against your order database, line by line if the volume is manageable.
- Watch error rates and payment reconciliation closely for the first 72 hours, since this window is when mismatched environment variables and forgotten webhook URLs tend to surface.
What Happens After a PayPal Payment Completes?
A successful capture is the start of the next process, not the finish line.
The moment your server receives a successful capture response, update your order’s status in your database immediately, before the customer’s confirmation page even loads. Don’t rely on the webhook alone to flip that status, since webhooks can arrive with a delay of seconds to minutes. Use the direct API response as your primary signal and treat the webhook as a confirming backup that also catches edge cases, like a payment that clears after a temporary network issue.
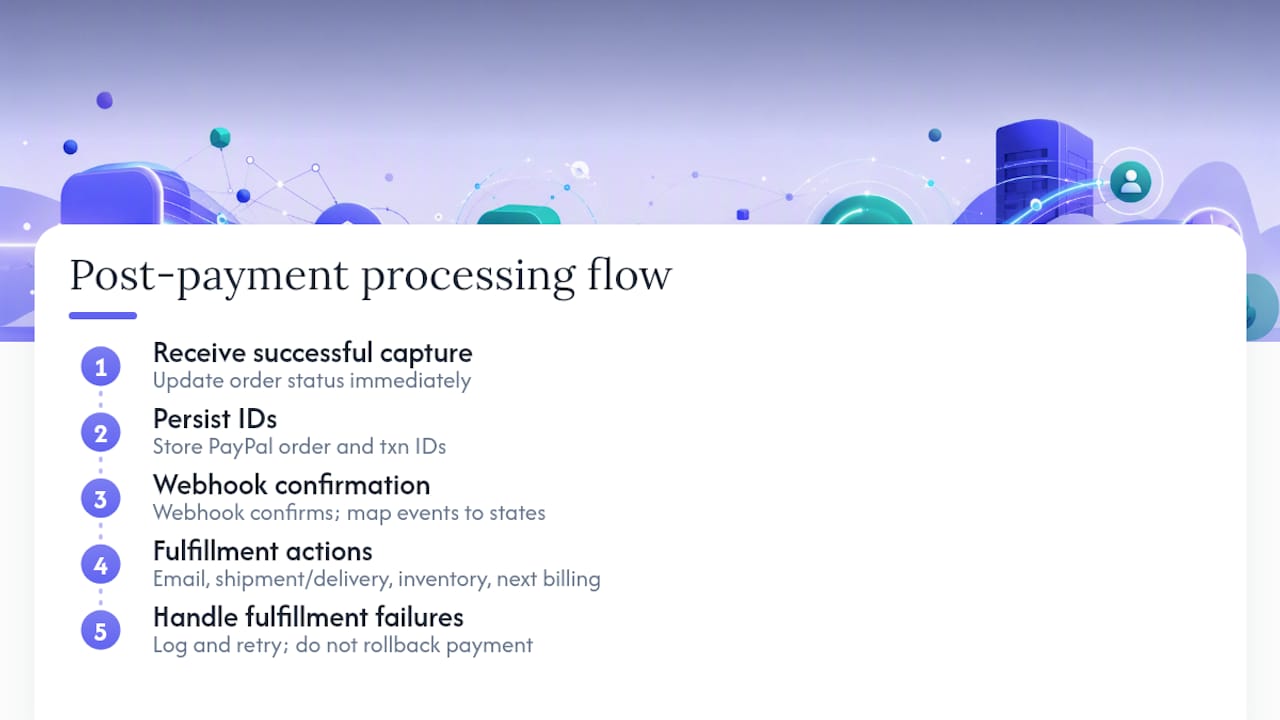
From there, fulfillment logic takes over: sending the confirmation email, triggering shipment or digital delivery, and updating inventory counts. If you’re running a subscription, this is also where you’d schedule the next billing cycle.
Build your webhook handler to track PayPal’s actual event types, like PAYMENT.CAPTURE.COMPLETED or PAYMENT.CAPTURE.DENIED, and map each one to a specific internal order state. A generic “paid” or “unpaid” flag isn’t enough once refunds, disputes, and delayed captures enter the picture. Store the PayPal order ID and transaction ID alongside your own order record, since you’ll need both when a customer contacts support about a specific charge.
One detail that trips up a lot of new integrations: a capture can succeed on PayPal’s end while your fulfillment logic fails, for example if your email service times out. Separate those two concerns. A failed email should never roll back a successful payment. Log it and retry the notification independently.
Common PayPal Integration Problems and How to Fix Them
Most PayPal integration issues repeat across businesses, which means most of them are already solved if you know where to look.
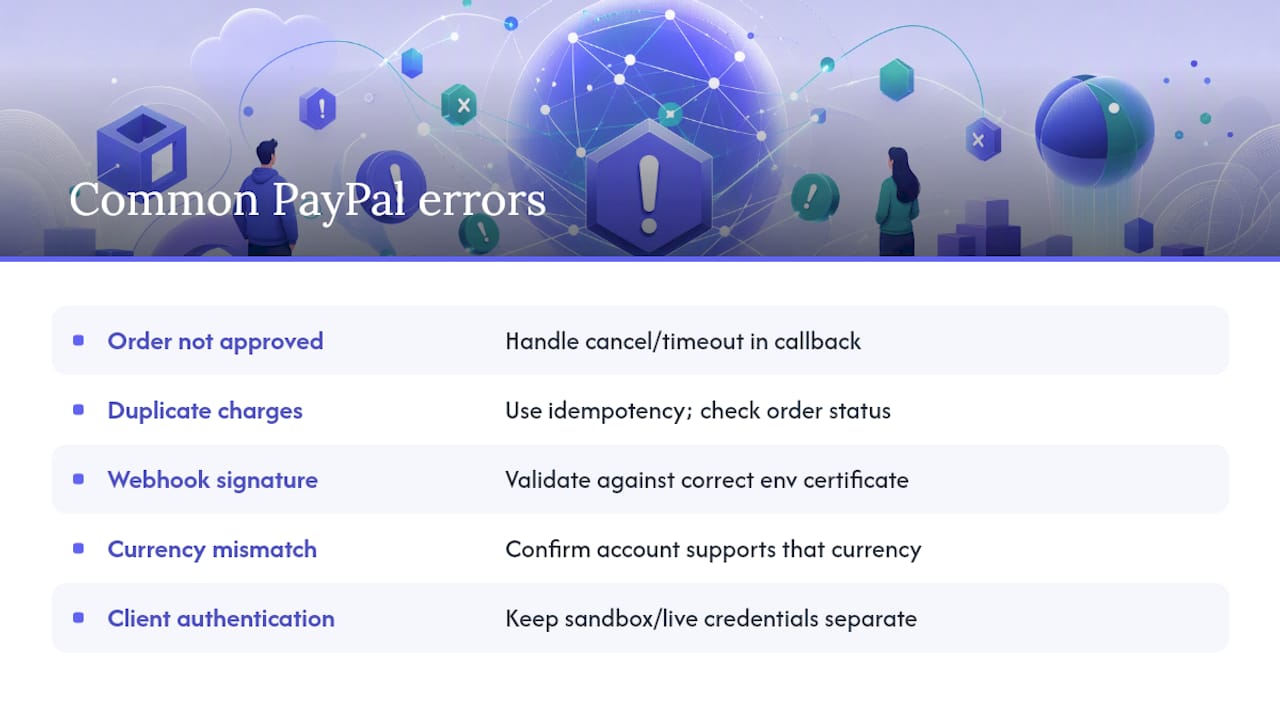
“Order not approved” errors usually mean the buyer closed the popup or the session expired before completing approval. Handle this gracefully in your onCancel callback instead of showing a raw error.
Duplicate charges almost always trace back to a missing idempotency check on your capture endpoint, often combined with a webhook and a direct API response both trying to trigger the same fulfillment logic. Check order status before every capture call.
Webhook signature failures are frequently a mismatched webhook ID between sandbox and production, since each environment has its own webhook configuration in the PayPal dashboard. Double-check you’re validating against the correct environment’s certificate.
Currency mismatch errors happen when your server sends a currency code that doesn’t match your PayPal account’s configured currencies. Confirm your account supports every currency you plan to charge in before launch.
“Client authentication failed” almost always means your OAuth 2.0 client ID and secret pair doesn’t match the environment you’re calling, sandbox credentials hitting a live endpoint, or vice versa. Keep sandbox and live credentials in clearly separated environment variable sets so this mismatch can’t happen silently.
If a transaction looks stuck in a pending state longer than expected, check whether it involves a payment method with a longer clearing time, like certain bank-funded PayPal payments, before assuming your integration is broken.
Why Most Businesses Overthink Their PayPal Setup
Most guides make PayPal integration sound harder than it is because they explain every API endpoint before answering the one question that actually matters: does this business need a custom checkout at all?
Here’s the uncomfortable truth: a large share of businesses reaching for the full JavaScript SDK and Orders v2 API don’t need it. They need three products, a fixed price list, and a button that works. The API route earns its complexity when you have subscriptions, a multi-step order lifecycle, or a checkout experience that has to feel native to your brand. Outside of those cases, it’s extra maintenance surface for a benefit nobody will notice.
The bigger blind spot isn’t the integration choice, though. It’s what happens after checkout. Businesses spend weeks perfecting the payment button and then wire up order fulfillment with a spreadsheet and a prayer. A PayPal integration that captures money flawlessly but doesn’t reliably update order status or trigger fulfillment isn’t actually finished. Treat post-payment logic with the same rigor as the checkout flow itself, because that’s where customer trust actually gets won or lost.
Skip the Integration Work Entirely With WebsitePublisher
If you’d rather describe your checkout than code it, WebsitePublisher gets you there faster. Our platform includes pre-built payment components as part of its 104-plus integrations, so PayPal setup happens through conversational prompts instead of environment variables and API calls.
You still keep full control. Credentials are handled securely behind the scenes, and reusable components mean you can update your checkout across every page at once instead of hunting down every embed code snippet. That matters whether you’re a freelancer shipping a client site this week or a small team that doesn’t have a developer on standby for webhook debugging.
Take a look at the AI website builder to see how payment integration fits into a full site build, or check pricing to find the plan that matches your project. If you want to see it in action first, the platform works with tools like Claude, so you can prompt your way to a working checkout page today.
Sources
- Payment links and buy buttons | PayPal Developer
Build your site the same way
Describe what you want. Your AI builds and publishes it — with the full stack behind it: data, auth, forms, payments, integrations and hosting.
See how it works →