 Website


add booking to website
Small Businesses: Add Booking to Your Site Without a Developer
Step-by-step, copy-paste instructions to add booking to your site for small businesses. Embed widgets, sync calendars, enable payments, test privacy, or...
Embed a booking widget directly on your site. That’s the fastest, lowest-effort path for most small businesses, and it keeps visitors from bouncing to a separate tab mid-decision. A booking link works as a quick fallback for email signatures or social bios, while API or custom builds only make sense for complex, multi-resource scheduling. Whatever you choose, lock down calendar sync, automated reminders, and payment collection before you go live. Some platforms bundle these features into one setup instead of multiple tools.
TL;DR:
- Embedding a booking widget directly on your site offers the best user experience and reduces bounce rates, especially for solo or small businesses.
- Choosing between embed widgets, booking links, dedicated pages, or API integrations depends on your business size, staff count, and complexity of scheduling needs.
- Proper setup includes defining services, syncing calendars, connecting staff, and testing bookings across devices and time zones before going live.
- Most site builders support simple embedding of booking codes, but ensuring responsiveness and correct placement enhances usability and conversions.
- Using an all-in-one platform like WebsitePublisher.ai can streamline setup and eliminate the need for multiple tools or technical debugging.
Table of Contents
- Which Method Should You Use to Add Booking to a Website?
- Step-by-Step Setup Checklist for Any Booking Tool
- How Do You Add a Booking Widget to WordPress, Wix, Squarespace, or Webflow?
- Calendar Sync, Payments, and a Privacy Checklist
- Testing and Launch Checklist Before You Go Live
- How WebsitePublisher.ai Shortens the Path to a Booking-Enabled Site
- What We’d Tell You If You Only Read One Section
- Build a Booking-Ready Site Without the Plugin Juggling Act
- Selected How-To and Official Resources
- Sources
- FAQ
Which Method Should You Use to Add Booking to a Website?
Four real options exist, and picking the wrong one costs you either money, time, or bookings you never see because a visitor gave up and left. Pembee’s breakdown of integration types groups them into embed widgets, booking links, dedicated booking pages, and custom API work, and that order roughly matches how much effort each one demands.
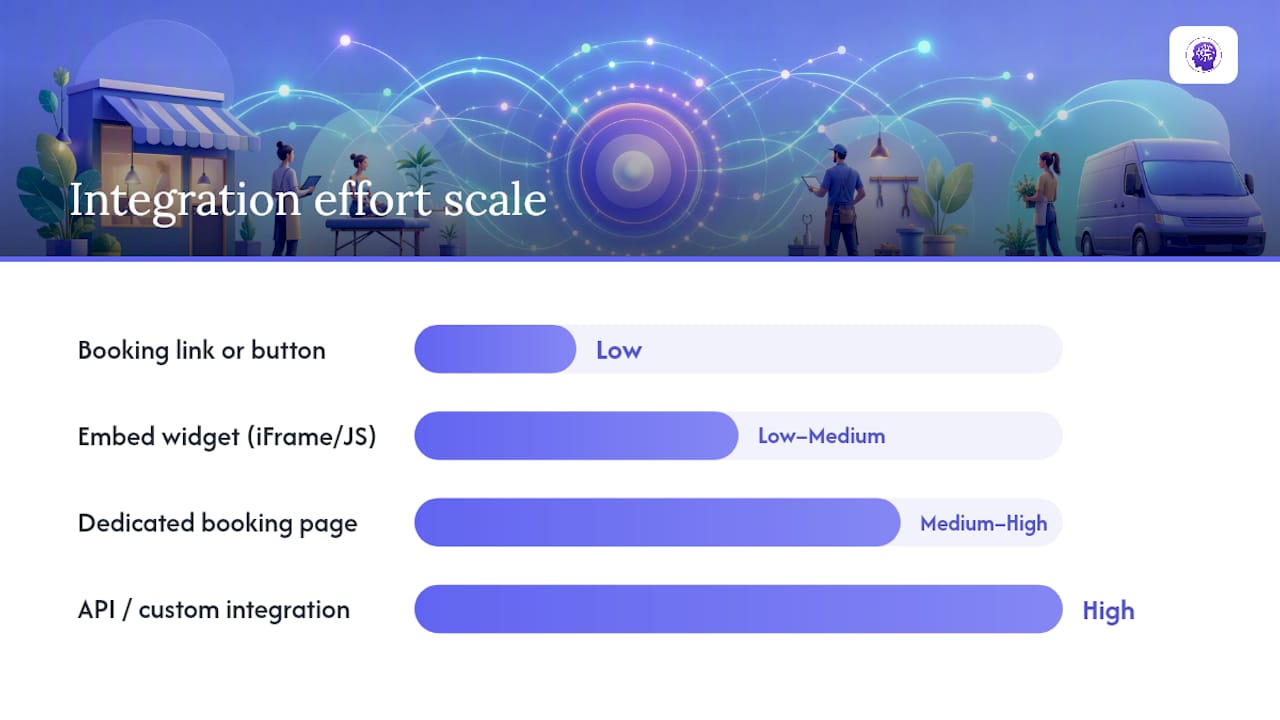
Embed widget (iFrame or JavaScript widget). This drops a scheduling calendar directly inside a page on your existing site. Visitors never leave your domain, which matters more than people assume. Meetergo’s research on booking page performance found that keeping users on-site during checkout avoids the context switch that kills conversions. A hair salon, a tutor, or a one-person consulting shop benefits most here because the booking flow feels like a natural extension of the page, not a detour.
Booking link or button. A standalone URL that opens a scheduling page, either in a new tab or as a popup. It takes minutes to set up and works anywhere an embed can’t, like email footers, Instagram bios, or paid ad landing pages. Shopify’s guide to booking sites treats the link as the baseline option every business should have, even if you also embed a widget elsewhere.
Dedicated booking page. A separate page on your site, built specifically for scheduling, often with more room for service descriptions, staff bios, or policy details than a compact widget allows. Multi-location gyms, medical offices, and businesses with several practitioners tend to need this extra space.
API or custom integration. Developers pull booking data directly into your own interface using a provider’s API. This costs real development time and ongoing maintenance, so it’s worth doing only when off-the-shelf tools can’t handle your scheduling logic. Complex multi-resource booking (equipment plus staff plus room, for example) or unusual business rules are the only scenarios that justify the cost.
Here’s the quick decision guide:
- Solo freelancer or consultant: booking link first, embed widget once you have a dedicated services page.
- Salon, spa, or fitness studio: embed widget on the homepage plus a dedicated booking page for staff selection.
- Group classes or workshops: dedicated booking page with capacity limits and waitlists.
- Multi-location or enterprise scheduling: API/custom integration, budget permitting.
Step-by-Step Setup Checklist for Any Booking Tool
The specific software changes, but the setup sequence stays the same whether you use a booking plugin, a standalone scheduling app, or a built-in feature inside your site builder.
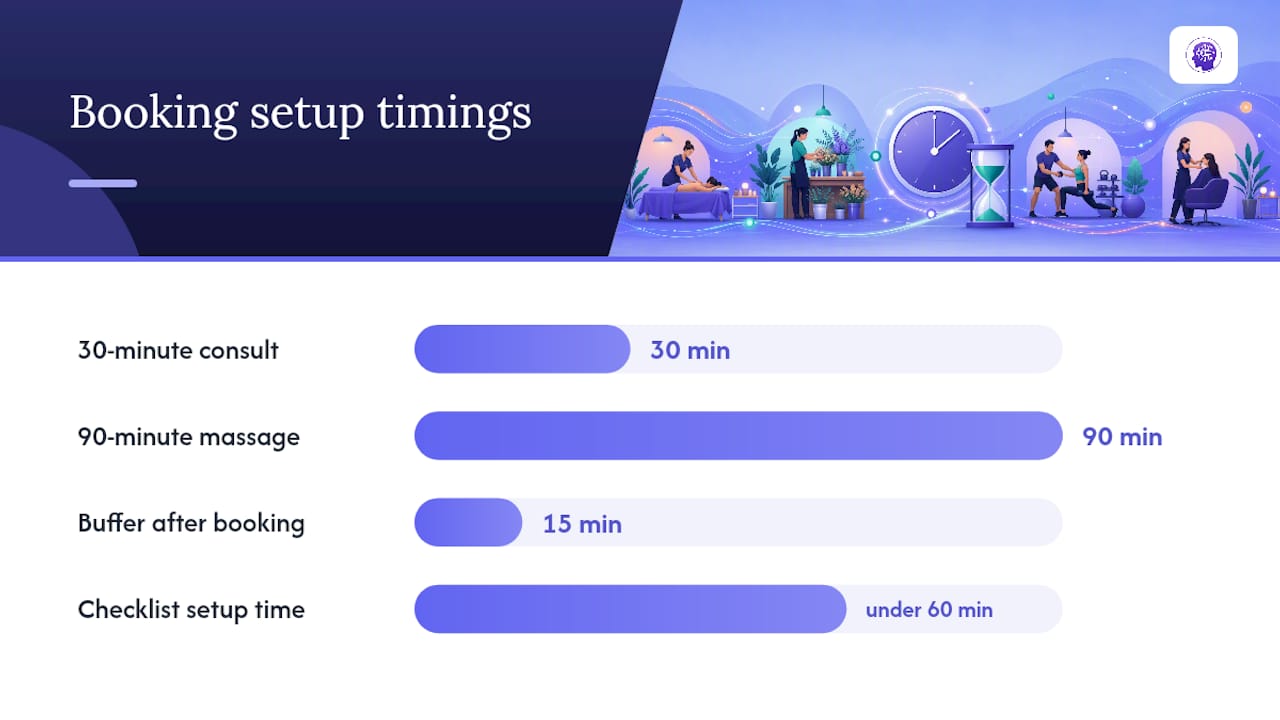
- Define your service or event types. List every bookable service with its duration and a short description. A 30-minute consult and a 90-minute deep-tissue massage need separate listings, not one generic “appointment” slot.
- Add buffer time between bookings. Fifteen minutes of padding after each appointment prevents the awkward scramble when one client runs long and the next one is already in your waiting room.
- Assign staff or stations. If more than one person or resource can take a booking, map each service to the right staff member or physical space so double-booking a single chair becomes impossible.
- Connect your calendar. Sync Google Calendar, Outlook, or iCloud/CalDAV so the tool blocks time automatically instead of relying on you to update two calendars by hand.
- Set your time zone correctly. This sounds obvious until a client three time zones away books what they think is 2 PM their time and shows up at 2 PM yours.
- Grab your embed code or booking URL. Every scheduling tool generates one or both. Copy it, then paste it into the page where it belongs, more on exact placement in the next section.
- Turn on automated reminders. Email at minimum, SMS if your tool supports it and your budget allows.
- Configure payment settings and cancellation policy. Decide whether you require full payment, a deposit, or nothing upfront, and set your cancellation window clearly so clients see it before they book.
- Run a test booking end to end. Book a slot yourself, pay the test amount if payments are live, and confirm you get a calendar block and a confirmation email.
Pro Tip: Book a test appointment from your phone on mobile data, not just your laptop on office WiFi. A shocking number of booking widgets render fine on desktop and then clip off a “Confirm” button on smaller screens, and you won’t find that bug unless you actually try to book from a phone.
Most booking tools, including Google Calendar’s appointment scheduling feature, handle steps four through eight inside one settings panel, so this checklist usually takes under an hour once your services are defined.
How Do You Add a Booking Widget to WordPress, Wix, Squarespace, or Webflow?
Every major site builder supports embedding a booking widget, but the exact click path differs enough to trip people up on their first try.
- WordPress: Add a Custom HTML block to the page where you want the widget, then paste your provider’s embed code directly into it. If you’d rather avoid touching code, most scheduling tools also publish a dedicated WordPress plugin in the plugin directory that adds a shortcode or block automatically.
- Wix: Use the Embed a Widget element from the Add panel, paste your iFrame or JavaScript code into the embed settings, and resize the box to match your page layout. Wix’s App Market also lists several scheduling apps that install with a few clicks if you’d rather skip manual embedding entirely.
- Squarespace: Add a Code Block to the page, paste your embed code inside it, and check the “resize to fit content” or similar responsive setting so the widget doesn’t get cut off on tablets. Squarespace renders code blocks close to how they’d appear on a raw HTML page, so test the widget immediately after saving.
- Webflow: Drop an Embed element onto the page canvas, paste your code into the embed’s HTML field, and set the element’s width to 100% with a defined height in your CSS settings so it scales cleanly across breakpoints. Webflow’s design mode won’t preview third-party JavaScript, so you’ll need to check the published page to see the widget render.
- Custom-built or hand-coded sites: Paste the iFrame or JavaScript snippet directly into your HTML where the booking section belongs, then add a minimal CSS rule setting
width: 100%and amax-widthon the container so it doesn’t overflow on small screens.
Meetergo’s platform walkthroughs confirm this same embed pattern across builders: find the code or embed block, paste, resize, publish. The mechanics rarely change, even when the software issuing the widget does.
Calendar Sync, Payments, and a Privacy Checklist
Two-way calendar sync is the feature that actually prevents double bookings, and it’s worth confirming before you trust any tool with your schedule. When a client books a slot, the tool should push that block to your calendar instantly, and if you manually add a personal appointment on your end, the tool should mark that time unavailable too. Google Calendar’s built-in appointment scheduling handles this natively, which is why it’s a common starting point for solo operators who don’t want a separate scheduling subscription.
For payments, most booking tools route through standard processors and support either full payment at booking or a smaller deposit with the balance due at the appointment. Always trigger an automatic receipt email; it cuts down on the “did my payment go through?” messages you’d otherwise field manually.
Reminders matter more than most business owners expect. Automated reminder emails and texts are widely credited with cutting no-show rates, and a common pattern among scheduling vendors is sending one reminder 24 hours out and a second one two hours before the appointment.
No-show reduction tip: Sending two reminders, one a day ahead and one a couple hours before, catches both the person who forgot entirely and the person who got distracted and lost track of time.
A short privacy checklist covers the basics for international readers:
- Collect only the data you need to fulfill the booking (name, contact info, service selected).
- Get explicit consent before adding a client to a marketing email list separately from their booking confirmation.
- Know how to locate and delete a client’s data if they request it, since GDPR-style controls are becoming standard even outside the EU.
- Store payment details with your processor, not in a spreadsheet you manage yourself.
Testing and Launch Checklist Before You Go Live
Run through this before announcing your booking page anywhere public:
- Complete one full test booking, including payment if you’re charging, and confirm the slot blocks correctly on your synced calendar.
- Test on at least two browsers and two devices, one desktop and one mobile, since widget rendering bugs show up disproportionately on phones.
- Check time zone handling by booking a slot as if you were a client in a different time zone, and verify the confirmation shows the correct local time on both ends.
- Test a cancellation and a reschedule, and confirm the freed slot reopens for other clients instead of staying blocked.
- If you assign specific staff or stations, book two overlapping test appointments to confirm the system actually prevents the double-booking it’s supposed to catch.
How WebsitePublisher.ai Shortens the Path to a Booking-Enabled Site
Our team sees a common pattern across customer projects: business owners want booking live without hiring a developer or juggling five separate tool subscriptions. WebsitePublisher.ai lets you describe your site in plain language, then draws on 104+ built-in integrations to wire up booking, payment, and email workflows using reusable components you can edit visually afterward. A typical workflow looks like this: describe your business and services in the conversation, let the platform generate a booking-ready page, then adjust availability and payment settings directly in the browser editor. No separate embed code to hunt down.
What We’d Tell You If You Only Read One Section
Start with the minimum viable setup: an embed widget, calendar sync, and reminders turned on. That combination handles the vast majority of small business booking needs without added complexity.
Three mistakes show up constantly in the projects we see. First, a booking link buried three clicks deep instead of sitting in the main navigation or hero section. Second, a time zone left on the default setting instead of the business’s actual location. Third, reminders left off entirely, which quietly inflates no-show rates.
Pro Tip: Put your “Book Now” button in the same spot on every page, top navigation or a sticky header, and use action-specific microcopy like “Check Availability” instead of a vague “Learn More.”
Build a Booking-Ready Site Without the Plugin Juggling Act
Most of the methods above require picking a scheduling tool, generating an embed code, then manually placing it inside whatever site builder you’re using, and hoping the responsive settings behave. Some platforms skip the hand-off between booking, payments, and email integrations, allowing you to describe what you need and connect components without a separate embed-and-test cycle.
That matters most for owners who don’t have a developer on call and don’t want to debug a widget that renders fine on desktop and breaks on mobile. You keep control over the visual design afterward too, since changes happen directly in the browser editor rather than locking you into one AI session. If you’re comparing the cost of stitching together a separate booking plugin, a calendar sync tool, and a payment processor against one platform that handles all three, start by exploring the AI website builder or check current plans to see which tier fits a booking-enabled site for your business.
Selected How-To and Official Resources
- Online Appointment Scheduling with Google Calendar: official setup docs for calendar-based booking pages.
- How To Make a Booking Website in 7 Steps: method comparisons and GDPR-conscious tool selection.
- How to Add a Booking Page to Your Website: platform-specific embed walkthroughs.
- 5 Options to Add a Booking System to Your Website: integration category breakdown, including when API/custom makes sense.
Sources
- Online Appointment Scheduling with Google Calendar
- How To Make a Booking Website in 7 Steps (2025)
- How to Add a Booking Page to Your Website (Step-by-Step Guide 2026)
- 5 Options to Add a Booking System to Your Website | Pembee
FAQ
How Do I Set Up a Booking System on a Website?
Choose an integration method (embed widget, booking link, or dedicated page), create your service types with durations, sync your calendar, then paste the embed code or link into your site and turn on reminders. The full sequence is covered in the step-by-step setup checklist above.
Is There a Free Booking Link I Can Use for My Business?
Several scheduling tools, including Google Calendar’s appointment scheduling feature, offer a free tier that generates a shareable booking link with calendar sync built in. Check each tool’s free-plan limits on the number of bookable services or monthly appointments before committing.
How Do I Make a Booking URL?
Most scheduling tools generate a unique booking URL automatically once you set up your services and availability, which you can then copy into email signatures, social bios, or your site’s navigation. No coding is required for this step; the link is auto-generated the moment you save your availability settings.
What Is the Best Booking Platform for a Small Business?
The right choice depends on whether you want a standalone scheduling tool paired with your existing site or an all-in-one platform. For businesses that want booking, payments, and email working together without stitching together separate plugins, a platform like WebsitePublisher.ai with built-in integrations reduces setup time considerably. Reading independent reviews on sites like Trustpilot is also worth doing before committing to any standalone scheduling tool.
Do I Need a Developer to Add Booking to My Website?
No, embed widgets and booking links from most scheduling tools require pasting a code snippet or link into your existing site, which any of the major builders support natively. A developer becomes necessary only for API or custom integrations built around unique scheduling rules.
Recommended
Build your site the same way
Describe what you want. Your AI builds and publishes it — with a real backend behind it.
See how it works →