 Website


stripe integration website
Stripe Integration for Small Teams: Checkout Sessions+Payment Element
Practical Stripe integration for small teams. Default to Checkout Sessions and the Payment Element, follow a concise checklist, or deploy without writing...
For most websites, the right path is Checkout Sessions paired with the Payment Element: your server creates a Checkout Session, returns a client_secret to the browser, and your front end mounts the Payment Element to collect payment. If you need something live in an hour with zero code, use a Payment Link instead. Everything sensitive, meaning your secret key and session creation, stays on the server.
TL;DR:
- Setting up Stripe with Checkout Sessions and Payment Element is recommended for most businesses due to its balance of control and ease of use, while Payment Links are fastest for immediate, code-free deployment.
- Proper integration requires creating server-side endpoints for session creation, securely handling API keys, and implementing webhooks for reliable payment confirmation and customer management.
- Using Stripe.js and the Payment Element improves security by preventing raw card data from touching your server and simplifies compliance with PCI, GDPR, and PSD2 regulations.
- Testing should involve Stripe’s sandbox environment with test cards, verifying all scenarios, and switching to live keys before going operational, with monitoring for webhook failures.
- Simplified platforms like WebsitePublisher.ai speed up Stripe integration through prebuilt, deployable components, ideal for teams without dedicated backend resources.
Table of Contents
- How Do You Add Stripe to a Website?
- Step-by-Step Checklist to Integrate Stripe Payments
- What Security Rules Matter Most for Stripe Integrations?
- How Do You Test a Stripe Integration Before Going Live?
- Why Are Stripe Payments Failing on Your Website?
- How WebsitePublisher.ai Speeds Up Stripe Integration
- How Do You Handle Multiple Currencies and Localization in Stripe?
- How Do You Set Up Subscriptions and Recurring Payments With Stripe?
- What Compliance Rules Apply to Stripe Integrations?
- What Performance Tips Improve Stripe API Usage?
- What Makes a Good Payment Flow UX?
- How Do You Manage Customer Data and Payment Methods Securely?
- Our Take: Stop Overbuilding Your Checkout
- Get a Stripe-Ready Site Without Writing the Checkout Yourself
- Sources
- FAQ
How Do You Add Stripe to a Website?
Adding Stripe to a website comes down to picking one of three integration paths, and the choice depends almost entirely on how much control you need versus how fast you need to ship. Stripe itself frames it this way: Payment Links, Checkout, and Elements represent increasing levels of technical overhead, and Stripe recommends Checkout Sessions with the Payment Element for most businesses.
Here’s how the three stack up:
- Payment Links require no code at all. You generate a hosted payment page from the Stripe Dashboard and share the URL or embed it as a button. Best when you need to start collecting money today, before you’ve built anything else.
- Checkout Sessions + Payment Element give you a prebuilt, customizable checkout page or embedded form. Stripe handles tax calculation, discounts, shipping, and dozens of payment methods for you, which is why Stripe’s own quickstart guide recommends this over lower-level APIs for most integrations.
- Elements + Payment Intents hand you raw UI components and full control over the payment flow, but you’re now responsible for building and maintaining checkout state, tax logic, subscription handling, and currency conversion yourself.
Run through this checklist before you pick: How fast do you need to launch? How custom does the checkout experience need to look? Do you need subscriptions or usage-based pricing? Does your team have the bandwidth to maintain a hand-built checkout flow long term?
Pro Tip: If you’re not sure which path fits, default to Checkout Sessions. You can always add Elements-based custom flows later for specific edge cases, but starting there means rebuilding, not extending.
Step-by-Step Checklist to Integrate Stripe Payments
A working Stripe integration follows a fairly consistent five-part process regardless of your tech stack, and Stripe’s own integration guide lays out this same sequence: create an account, grab your keys, install the libraries, build the front end, then wire up the server.
- Create your Stripe account and get your API keys. Your Stripe Dashboard gives you two keys: a publishable key (safe for client-side code) and a secret key (server-only, never exposed in a browser).
- Install the SDKs for your stack. Load Stripe.js on the client. On the server, install the appropriate library for your language, whether that’s
stripe-node,stripe-python,stripe-ruby, or the Java SDK. - Build the server endpoint that creates the session. Your backend creates a Checkout Session or PaymentIntent using the secret key, sets a
return_url, and if you’re using the embedded Payment Element, setsui_mode: 'elements'. The endpoint returns only theclient_secretto the browser, never the secret key itself. - Mount the Payment Element on the client. Initialize Stripe.js with your publishable key, pass the
client_secretinto the Checkout provider, and mount the Payment Element into a container on your page. Handle validation errors and loading states here. - Set up a webhook endpoint. Create a route that listens for
checkout.session.completedorpayment_intent.succeeded, verify the signature Stripe sends, and use that event, not the client-side redirect, to mark the order as paid. - Persist customers and payment methods. Store the Stripe customer ID against your user record so returning customers can reuse saved cards, and trigger your receipt or confirmation email off the webhook event, not the browser redirect.
For working code you can adapt directly, Stripe maintains the stripe-samples repository on GitHub with real, runnable integrations across multiple languages and frameworks. That repo will save you more debugging time than any tutorial.
A few things trip up almost every developer on their first pass:
- Forgetting that the
client_secretis safe to expose, but the secret key never is. - Building the client-side confirmation logic and assuming it’s reliable, when only the webhook confirms payment server to server.
- Skipping idempotency handling, which causes duplicate orders when Stripe retries a webhook delivery.
What Security Rules Matter Most for Stripe Integrations?
Using Stripe.js and the Payment Element instead of building your own card form is the single biggest security decision you’ll make, because it means raw card numbers never touch your server, which dramatically shrinks your PCI compliance scope. The Payment Element handles input validation, formatting, and over 100 payment methods inside Stripe’s own secure iframe.
Beyond that, a short list of rules covers almost every real security incident we see in Stripe integrations:
- Never put your secret key in front-end JavaScript, a mobile app bundle, or a public repository. Sessions and PaymentIntents must be created server-side.
- Verify every webhook signature using your signing secret before trusting the payload. Stripe’s webhook documentation covers the exact verification pattern for each language.
- Log webhook payloads and build idempotency handling so a retried delivery doesn’t create a second order for the same payment.
- Keep your server behind TLS, limit which endpoints are publicly reachable, and rotate API keys if you ever suspect one has leaked.
Pro Tip: Restrict your Stripe API keys to only the permissions they need. A key that only creates Checkout Sessions is far less dangerous if leaked than one with full account access.
How Do You Test a Stripe Integration Before Going Live?
Testing happens entirely in Stripe’s sandbox using test API keys and Stripe’s published test card numbers, which let you simulate successes, declines, and 3D Secure challenges without moving real money. Stripe’s payment acceptance guide recommends running through five scenarios before you trust an integration: a successful payment, a declined card, a 3DS authentication challenge, a refund, and a saved-card repeat purchase.
The Stripe CLI lets you replay webhook events locally, so you don’t have to deploy just to see if your endpoint handles payment_intent.succeeded correctly.
Before flipping the switch to production, run this checklist:
- Swap every test key for its live equivalent, on both client and server.
- Confirm your webhook endpoint uses the live signing secret, not the test one.
- Verify your bank account and payout settings are confirmed in the Dashboard.
- Enable the specific payment methods you want live (not just what’s on by default).
- Set up monitoring or alerts on failed webhook deliveries so silent failures don’t go unnoticed.
Why Are Stripe Payments Failing on Your Website?
Most Stripe issues fall into four buckets, and diagnosing them fast usually means checking the Dashboard logs before touching your code.
- Declines and authentication errors get confused. A decline code means the card issuer said no; an authentication error means 3D Secure wasn’t completed. Map each to a distinct, honest message for the customer instead of a generic “payment failed.”
- Webhooks silently stop arriving. Check that your endpoint URL matches what’s registered in the Dashboard and that signature verification isn’t rejecting valid payloads due to a stale signing secret.
- Payment Element won’t mount, or CORS errors appear. This almost always traces back to a missing or malformed
client_secret, or a mismatch between your Stripe.js script version and your integration type. - Duplicate charges appear after retries. Add idempotency keys to your PaymentIntent or Checkout Session creation calls so retried requests don’t create a second charge for the same order.
How WebsitePublisher.ai Speeds Up Stripe Integration
Our platform includes prebuilt payments integration as one of its 104-plus built-in options, alongside backend endpoints and deployable React pages, so a typical Checkout Sessions flow, meaning a server endpoint that creates the session and a client page that mounts the result, can be assembled through a conversation instead of hand-written from scratch. Reusable components and data-driven pages mean your checkout layout stays consistent across products without rebuilding it each time.
This approach fits fast builds and teams without dedicated backend developers. If you need highly customized subscription logic, multi-entity tax handling, or a fully bespoke checkout UI, you’ll still want a custom Elements-based integration built and maintained by a developer.
How Do You Handle Multiple Currencies and Localization in Stripe?
Checkout Sessions handle currency and localization largely for you, which is one of the strongest arguments for choosing that path over a custom build. When you create a session, you specify the currency for that transaction, and Stripe’s checkout use-case documentation notes that features like adaptive pricing and automatic tax calculation reduce the manual work of adjusting prices per region.
For a site selling to customers in multiple countries, a few decisions matter more than others. First, decide whether you’re charging every customer in one base currency or presenting localized prices in their local currency. Presenting local currency generally improves conversion, but it means maintaining a pricing table or using Stripe’s adaptive pricing feature to convert automatically at checkout.
Second, the Payment Element automatically surfaces payment methods relevant to the customer’s location and currency. A customer in the Netherlands checking out in euros will see iDEAL as an option; a customer paying in US dollars will not. You don’t have to build this logic yourself. It’s tied to the currency and country context of the session.
Third, tax handling gets more complex across borders. Checkout Sessions can calculate tax automatically based on the customer’s location, which matters for VAT in the European Union and sales tax across different US states. Building this yourself with a raw Payment Intents integration means owning that tax logic entirely, which is a significant undertaking most small teams shouldn’t take on alone.
Language matters too. Stripe’s Payment Element supports localized text out of the box based on browser locale, so your checkout form fields, error messages, and button labels adjust automatically without extra translation work on your end.
How Do You Set Up Subscriptions and Recurring Payments With Stripe?
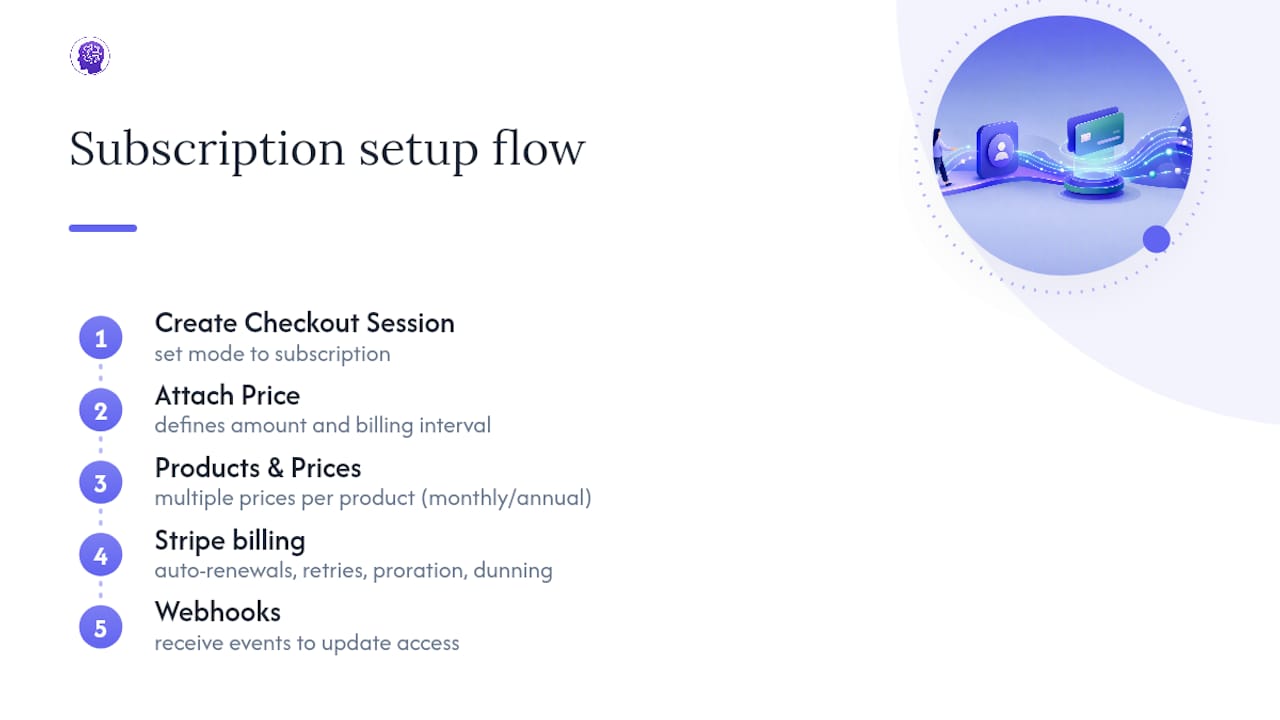
Recurring billing runs on top of the same Checkout Sessions foundation, just configured with a subscription mode instead of a one-time payment mode. When you create the Checkout Session, you set the mode to subscription and attach a Price object that defines the billing interval, whether that’s monthly, annually, or a custom interval.
The core building blocks are Products, Prices, and Subscriptions. A Product represents what you’re selling; a Price represents how much and how often you charge for it. You can attach multiple prices to a single product, which is how most SaaS businesses handle monthly versus annual plans without duplicating product data.
Stripe manages the recurring billing cycle itself: it automatically attempts to charge the saved payment method on each renewal date, retries failed charges using its own smart retry logic, and fires webhook events like invoice.payment_succeeded and invoice.payment_failed so your application can update access accordingly. This is the part developers most often underestimate. If you build a custom subscription system without webhooks driving your access control, you will eventually have customers who paid but lost access, or customers who didn’t pay but kept it.
For trials, proration when customers upgrade or downgrade mid-cycle, and dunning management when a card fails repeatedly, Stripe’s subscription objects handle the logic natively rather than requiring you to write state machines by hand. That’s a meaningful amount of work you don’t have to reproduce, and it’s part of why Checkout Sessions remain the recommended default even for subscription businesses rather than a fully custom Payment Intents build.
What Compliance Rules Apply to Stripe Integrations?
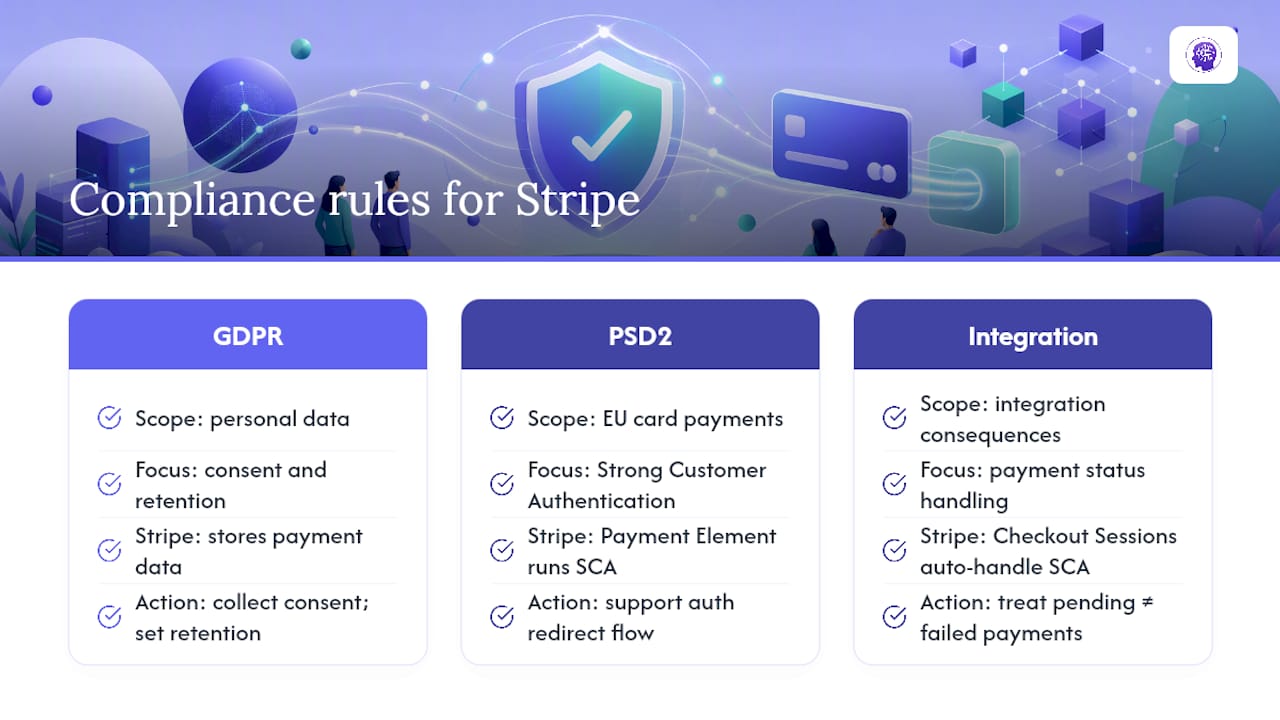
GDPR and PSD2 both shape how a Stripe integration should be built, particularly for any site with customers in the European Union. GDPR governs how you store and process customer personal data, including anything tied to a Stripe customer record like email, name, or billing address. Using Stripe to store payment methods reduces your own compliance burden somewhat, since Stripe holds the sensitive payment data rather than your database, but you’re still responsible for how you collect consent and how long you retain customer records tied to those payments.
PSD2, the EU’s revised Payment Services Directive, mandates Strong Customer Authentication for many card payments in Europe, which is why 3D Secure authentication challenges appear during checkout for European cards. The Payment Element handles this authentication flow automatically. When a payment requires additional verification, Stripe presents the challenge inline without you writing custom authentication logic.
Where teams get this wrong is assuming compliance is purely a legal question handled elsewhere. It has real integration consequences: your Checkout Session needs to support the authentication redirect flow correctly, and your webhook logic needs to treat a payment that’s pending authentication differently from one that’s failed outright. If your custom Payment Intents integration doesn’t handle the requires_action status correctly, European customers using cards that require Strong Customer Authentication will see broken checkouts. Checkout Sessions handle this status transition for you by default.
What Performance Tips Improve Stripe API Usage?
Stripe API calls add latency to your checkout flow, so how you structure your calls affects how fast the page feels to a customer standing there with a card in hand. A few habits make a real difference.
Avoid creating a new Checkout Session on every page load if a customer refreshes the checkout page. Cache the session or check for an existing valid session before creating a new one, since redundant session creation adds unnecessary API round trips and can create confusing duplicate sessions in your Dashboard.
Batch related lookups where Stripe’s API supports it, rather than making sequential calls for a customer record, then a payment method, then a subscription status, when a single expanded request can return all three. Stripe’s API supports the expand parameter on many endpoints specifically to avoid this kind of chained-call latency.
Handle webhook processing asynchronously. Your webhook endpoint should acknowledge receipt to Stripe quickly, ideally in under a few seconds, and hand off the actual order fulfillment or email sending to a background job. An endpoint that does heavy processing before responding risks timing out and triggering unnecessary Stripe retries.
Finally, monitor your API usage in the Stripe Dashboard for unexpected spikes, which often point to a retry loop or a bug creating duplicate requests rather than genuine traffic growth.
What Makes a Good Payment Flow UX?
The checkout flow is the single moment on your entire site where hesitation costs you money directly, so the design choices here carry more weight than almost anywhere else on the page. A few patterns consistently perform better.
Keep the Payment Element visible on the same page as the order summary whenever possible. Redirecting customers to a separate page for payment after they’ve already committed mentally on a cart page introduces a drop-off point that doesn’t need to exist.
Show clear, real-time validation. The Payment Element handles field-level validation natively, catching a malformed card number or an expired date before the customer hits submit rather than after. Don’t override this with your own duplicate validation logic; it creates conflicting error messages.
Surface the total price, currency, and any taxes clearly before the final confirmation click. Hidden fees discovered at the last second are one of the most common reasons carts get abandoned.
Design for failure states as carefully as you design for success. A generic “something went wrong” message after a decline frustrates customers who don’t know if their card was charged. Use Stripe’s returned error messages, which are written for end users, rather than raw API error codes.
How Do You Manage Customer Data and Payment Methods Securely?
Stripe’s Customer object is the right place to store payment methods for repeat customers, and it exists specifically so you never need to store card data on your own servers. When a customer saves a card during checkout, Stripe attaches that payment method to a Customer record you reference by ID in your own database, not the card details themselves.
Store only the Stripe Customer ID and subscription or payment status flags in your own systems. Anything more, meaning actual card numbers or CVV codes, should never appear in your database or logs, and Stripe’s architecture is built to make that unnecessary in the first place.
For teams running e-commerce stores, general site hardening also matters here since a compromised admin panel or plugin can expose customer records even when payment data itself is safely offloaded to Stripe. Resources like this rundown of WooCommerce security plugins cover the broader site-hardening steps worth pairing with your Stripe setup.
Give customers visibility into their own saved payment methods and a clear way to remove one. This isn’t just good practice: it reduces support requests from customers who don’t understand why a card keeps getting charged for a subscription they forgot about.
Our Take: Stop Overbuilding Your Checkout
The most common mistake we see across customer projects is teams reaching for Payment Intents and custom Elements when Checkout Sessions would have covered their actual requirements. Developers often assume “custom” means “better,” but a hand-built checkout means you’re now maintaining tax logic, currency handling, and authentication flows that Stripe already solved.
Conventional advice tends to treat integration choice as a technical preference. It’s really a maintenance decision. A solo developer or small team who picks Elements and Payment Intents for a standard e-commerce store isn’t buying flexibility; they’re buying an ongoing obligation to keep pace with every change Stripe makes to tax rules, payment methods, and authentication requirements.
Our advice: default to Checkout Sessions with the Payment Element unless you have a specific, named reason not to, like a genuinely unique multi-party payment flow. Get the webhook handling correct before anything else, since that’s where reliability actually lives, not in the front-end form. And if your team’s real constraint is developer hours rather than payment complexity, a platform that assembles the standard flow for you is a legitimate shortcut, not a compromise.
Get a Stripe-Ready Site Without Writing the Checkout Yourself
Building a Stripe integration by hand means writing server endpoints, wiring webhooks, and testing every failure state before you can trust it with real transactions. WebsitePublisher.ai gives you that same payments integration as one of its 104-plus built-in options, so the server endpoint and the client-side Checkout page get assembled through a conversation instead of a multi-day build.
You describe the site you want, including the fact that it needs to accept payments, and the platform handles the standard scenario: a working server endpoint paired with a deployable React checkout page, editable afterward in your browser without needing another AI session to make a change. This isn’t a replacement for bespoke, enterprise-grade payment engineering with unusual multi-party flows or highly custom subscription logic. For a standard store, landing page, or service business that needs to start accepting cards without hiring a backend developer, it removes the setup work entirely. Check the AI Website Builder page to see what’s included, or look at current plans and pricing to get started today.
Sources
FAQ
Is Stripe Checkout Free to Integrate?
Stripe doesn’t charge extra to use Checkout Sessions or the Payment Element; you pay Stripe’s standard per-transaction processing fee regardless of which integration path you choose.
Do I Need a Server to Use Stripe?
Yes. Checkout Sessions and PaymentIntents must be created server-side using your secret key, and only the resulting client_secret is safe to send to the browser.
What’s the Difference Between Payment Links and Checkout Sessions?
Payment Links require no code and work from a shareable URL, while Checkout Sessions are created through your own server and give you more control over the flow, metadata, and post-payment logic.
Can I Test Stripe Payments Without Real Money?
Yes. Stripe’s test mode uses dedicated test API keys and published test card numbers that simulate successful payments, declines, and 3D Secure challenges without moving actual funds.
Does WebsitePublisher.ai Support Stripe Payments?
WebsitePublisher.ai includes prebuilt payments integration among its built-in options, letting you deploy a site with a working Stripe Checkout flow without writing the server endpoint or client code yourself.
Build your site the same way
Describe what you want. Your AI builds and publishes it — with a real backend behind it.
See how it works →